Battle Royale is a marathon. Clash Squad (CS) is a street fight in a phone booth. If you bring a Battle Royale mindset into a CS Ranked match, you will be destroyed in 30 seconds. There is no looting. There is no hiding for placement points. There is only raw mechanics, money management, and character synergy.
Most players get stuck in CS Heroic or Master because they play every round the exact same way. They buy an MP40, rush the middle, die, and complain about their teammates. Hitting Grandmaster in Clash Squad requires you to treat the game like CS:GO or Valorant. You need to understand the snowball effect of the economy, counter-picking the enemy’s characters, and holding specific map geometries.
This is the ultimate, 2000-word tactical blueprint for Clash Squad Ranked in 2026. Put your ego aside, read every section, and watch your win rate skyrocket.
1. Round 1: The Foundation of Victory
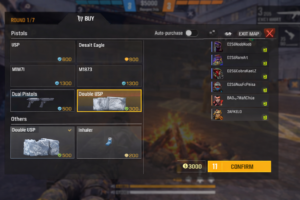
Round 1 is a pistol-only round. You start with 500 coins. How you spend this money determines the trajectory of the next two rounds. Winning Round 1 gives you a massive financial advantage.
The M500 vs. Double USP Debate
There are only two correct choices in Round 1. The G18 is a trap for lazy players. Do not buy it.
The M500 (400 Coins): This is a pocket sniper. A single headshot deals over 200 damage, resulting in an instant knock. If you have incredible drag-headshot skills, the M500 is your best friend. However, if you miss your first two shots, you are extremely vulnerable because the fire rate is terrible.
The Double USP (Free if unlocked in loadout): This is the aggressive player’s choice. It fires insanely fast. If your entire squad equips Double USPs and rushes one single target, you will melt them in 0.5 seconds. The best part? It’s free. This leaves you with 500 coins.
The 500 Coin Advantage
If you take the free Double USP, what do you do with the 500 coins? You buy a Gloo Wall (300 coins) or a Flashbang (200 coins). Having a Gloo Wall in Round 1 is practically cheating. While the enemy is stuck behind a wooden box trying to aim their M500, you can push them aggressively across open ground, throw down a wall, and spray them with your USPs.
2. The Economy: Mastering the “Snowball”
If you win Round 1, you snowball. If you lose, you must play the “Eco” (Economy) game. The biggest mistake random squads make is buying whatever they can afford, resulting in a team with mismatched gear.
The “Force Buy” (Winning Round 1)
If you win Round 1, you will have around 1500-2000 coins. Do not save money here. Spend it all. Your goal is to crush the enemy in Round 2 while they are broke.
- Primary Buy: UMP, MP5, or Thompson. Do not buy expensive shotguns yet. SMGs are cheap and versatile.
- Armor: Buy a Level 2 Vest or Helmet. The enemy will likely be using pistols or cheap SMGs in Round 2. Your armor will make you an absolute tank against them.
The “Eco Round” (Losing Round 1)
If you lose Round 1, you are broke (around 1000 coins). The enemy has SMGs and armor. If you try to buy a UMP, you won’t have money for armor or Gloo Walls. You will die instantly.
The Pro Play: Accept that you are at a disadvantage. Buy a Desert Eagle (800 coins) and a Gloo Wall. Play passively. Hold tight angles. Your goal in this round is to land one lucky one-tap headshot with the Eagle, run to their body, and steal their UMP. If you lose this round, it’s fine. By Round 3, you will have a massive bank of coins for a “Full Buy.”
The Team Drop System
You have 4000 coins. Your teammate has 500 coins. If you buy a Groza and full armor for yourself and leave your teammate with a pistol, you are a terrible teammate. You are effectively playing a 3v4. Buy a UMP, drop it on the ground, and ping it for your teammate. A squad with four decent guns will always beat a squad with one great gun and three pistols.
3. The “Toxic” Meta: Character Synergies for CS
Battle Royale characters like K or Ford are terrible in Clash Squad. You don’t have time for passive healing. In CS, fights are decided in 3 seconds. You need burst abilities.
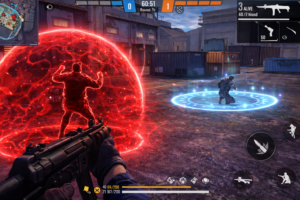
The “Invincible” Orion Setup
Orion replaces your EP with Crimson Energy. When activated, you become a red orb of energy. You cannot take damage, you cannot be targeted, and you drain the HP of enemies near you. It is the most frustrating skill to fight against.
- The Synergy: Orion requires the passive character Miguel. Miguel gives you 200 EP (Crimson Energy) every time you knock an enemy.
- The Loop: You activate Orion -> You rush and knock an enemy -> Miguel instantly refills your energy -> You activate Orion again immediately. You can literally wipe an entire squad without taking a single bullet.
The “Zombie” Dimitri + Thiva Setup
If you play against a coordinated squad running this, you will want to uninstall the game.
- Dimitri: Creates a healing zone. If you are knocked down inside the zone, you can self-revive.
- Thiva: Increases the speed of helping up teammates by 70%, and heals the recovered user.
How it plays: The enemy rushes you. You knock one of them. The enemy drops a Gloo Wall and pops Dimitri’s circle. Within 2 seconds, the knocked player is back up with full health shooting you. You have to kill the same player three times. To counter this, you must use Grenades or the character Skyler to break their walls and flush them instantly before they can revive.
4. Map Geometry: Holding the Choke Points
In CS, you don’t have a massive map to rotate around. You have a tiny boxed-in arena. Controlling specific physical locations (High Ground and Choke Points) guarantees a win.
Map 1: Clock Tower
Clock Tower is the most iconic CS map. The team that spawns on the bottom (near the water) has a distinct disadvantage because they have to push uphill.
The Strategy: The most important piece of real estate on this map is the Black House (the two-story house next to the tower). Send your fastest rusher (with Tatsuya) straight to the second floor of this house. From those windows, you can see the entire middle courtyard and the enemy’s spawn path. If you hold the Black House, the enemy is forced to push the open staircase or the lower tunnel, both of which are easy to defend with grenades.
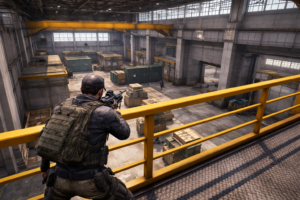
Map 2: Factory
Factory is split into two halves: the open container yard and the enclosed staircases.
The Mistake: Rushing the middle of the containers. It is a death trap. There are too many angles to check.
The Strategy: Push the Yellow Metal Stairs on the far right or left edge. Get to the second floor railing. From here, you have a massive vertical advantage. You can shoot down into the container yard. The enemy’s auto-aim will struggle to lock onto you because only your head and shoulders are visible over the metal railing. If they try to push up your stairs, pre-cook a grenade and bounce it off the wall into the stairwell.
Map 3: Pochinok
Pochinok is a cluster of wooden and concrete houses. Fights here are close and messy.
The Strategy: Roof control. There is a specific concrete house with tires on the side. Jump on the tires to launch yourself onto the roof. From the roof, you can jump across to the adjacent wooden roofs. Enemies rarely look up in Pochinok. They expect you to peek from windows or doors. While they are aiming at the front door, you are shooting them in the back of the head from the roof tiles.
5. The Art of the Comeback (Winning from 0-3)
The score is 0-3. Your teammates are spamming “Good Job!” sarcastically. Most players give up here. But a 0-3 comeback is very possible in Clash Squad because of the economy cap.
When the enemy team wins 3 rounds in a row, they have maximum money. But Free Fire caps the amount of gear you can carry. They can only have a Level 3 Vest, a good gun, and 3 Gloo Walls. Meanwhile, because you lost 3 rounds, you get a “Losing Streak Bonus” in coins.
In Round 4, you have the exact same buying power as them. The playing field is completely level.
The Comeback Tactics:
- Change the Pace: If you lost the first 3 rounds by rushing aggressively, the enemy expects you to rush again. Do the opposite. Buy snipers (Woodpecker/AC80) and camp your spawn. Force them to get bored and push you. When they push your spawn, they lose their positional advantage.
- Target the Carry: Every random squad has one “Carry” (a guy with 8 kills) and three average players. Identify the skin or character of the Carry. Tell your team to focus all their fire on him first. If you kill the Carry, the other three players will panic and crumble.
- Spam Utility: Buy Flashbangs. Nobody uses Flashbangs in Diamond rank, but in Grandmaster, they are essential. Throw a Flashbang over a wall before you push. A blind enemy is a dead enemy.
6. The Sniper Role in a 4v4 Arena
Can you use an AWM in Clash Squad? Yes, but only if you are exceptionally disciplined. If you buy an AWM and miss, you are actively griefing your team because you are useless in a close-range scramble.
If you play the Sniper role, you must be the Anchor. You stay at the very back of your spawn, holding the longest sightline possible. Your job is not to get 10 kills. Your job is to hit an enemy for 150 damage in the body.
The moment you hit that 150, you must communicate over the mic: “One is 150 on the left side!” Your rushers will immediately push that player, knowing they only need to deal 50 damage to secure the knock. A good sniper creates opportunities; they don’t hunt for glory.
Conclusion
To master Clash Squad Ranked, you must stop playing it like a chaotic deathmatch. Think of it as a game of chess. Manage your economy so you never have to fight an M1887 with a USP. Use Orion and Dimitri to abuse the game’s mechanics. Memorize the high-ground angles on Clock Tower and Factory. If you play mathematically and tactically, you won’t need to rely on lucky headshots to reach Grandmaster. You will simply outsmart the lobby.
Frequently Asked Questions (FAQ)
Q: Should I upgrade my armor or buy a better gun if I’m short on coins?
A: Always upgrade your armor first. A Level 3 Vest with a cheap UMP is vastly superior to a Level 1 Vest with an expensive Groza. If you die instantly because your armor is weak, your expensive gun is useless and just gets picked up by the enemy.
Q: Why do some players drop their weapons on the ground before the round ends?
A: If you know you are going to die (e.g., you are the last one alive against 4 enemies and the zone is closing), you can drop your expensive guns and Gloo Walls into an unreachable spot or the blue zone. This prevents the enemy team from picking up your gear and carrying it into the next round.
Q: Is the Vector Akimbo (Double Vector) still good in Clash Squad?
A: It is highly situational. It deals insane damage at point-blank range, but you cannot use Gloo Walls quickly while holding them, and the reload time is dangerous. In high-rank lobbies, players will just step back 10 meters and kill you with an MP40 because the Vector’s range is terrible.
4 Comments
Rohiy · March 10, 2026 at 11:32 am
Wow
Mohd Saeed · March 10, 2026 at 3:01 pm
Unique
Pratyush · March 21, 2026 at 4:29 am
Wow
Anshul Sahu · March 27, 2026 at 1:28 am
Wow nice