I have been playing Free Fire since 2017. I remember the days of the old Bermuda map, where players would lie prone in the grass because the auto-aim wouldn’t lock onto them. The game was slow. Today, in 2026, the game is a high-speed, hyper-competitive adrenaline rush. If you cannot land a “Drag Headshot” within 0.5 seconds of seeing an enemy, you are going back to the lobby.
Every day on my YouTube channel, the number one comment I get is: “Aijaz bhai, please give me your sensitivity settings!”
Here is the hard truth that most YouTubers won’t tell you: There is no such thing as a magical “Auto-Headshot” setting. If you copy the settings of a player using an iPhone 15 Pro Max, and you are playing on a 3-year-old Android phone with 4GB of RAM, those settings will ruin your gameplay. The physics of your screen are completely different.
Furthermore, any website or video offering a “Config File,” “Regedit,” or “VIP Script” to increase your headshot rate is scamming you. Using those will result in an immediate, permanent account ban from Garena. We play fair, and we win with skill.
In this massive, 2500+ word masterclass, we are going to approach Free Fire sensitivity scientifically. We will break down exactly what every slider does, the difference between “Refresh Rate” and “Touch Sampling Rate,” the secret world of DPI scaling, and provide precise base numbers for Low-End, Mid-Range, and High-End mobile devices. Grab a notebook; class is in session.
1. The Hardware Physics: Why Phones React Differently
Before we touch the sliders in the game menu, you must understand the glass you are touching with your thumb. Not all mobile screens are created equal.
Refresh Rate (Hz) vs. Touch Sampling Rate (Hz)
Many players boast about having a “120Hz display.” But what does that mean for your aim?
- Refresh Rate (e.g., 60Hz, 90Hz, 120Hz): This is how many times per second the screen draws a new image. A higher refresh rate makes the game look incredibly smooth. When an enemy runs, they don’t look like they are teleporting; they glide.
- Touch Sampling Rate (e.g., 120Hz, 240Hz, 360Hz): This is the stat that actually matters for headshots. Touch sampling rate is how many times per second the screen looks for your thumb. If you have a 360Hz touch sampling rate (common in gaming phones like the ROG or Black Shark), the moment you drag your thumb, the crosshair moves instantly. On a cheaper phone with a 60Hz touch sampling rate, there is a micro-millisecond delay. Your thumb moves, and the crosshair follows slightly later.
If you have a low touch sampling rate, you need higher in-game sensitivity to compensate for the hardware lag.
The Android vs. iOS Divide
There is a massive difference in how the operating systems handle touch input. iPhones are famous in the Free Fire community because iOS has almost zero touch latency and highly optimized hardware acceleration. An iPhone player with “General” sensitivity set to 80 will experience the same screen speed as an Android player with their General set to 100.
2. Deconstructing the 6 Sensitivity Sliders
Open your Free Fire settings and click on the “Sensitivity” tab. You will see six sliders. Let’s break down exactly what each one controls, because many players misunderstand them.
A. General Sensitivity (The Holy Grail)
This is the most important slider in the game. It controls two things:
- Your Camera Turn Speed when you look around while running.
- Your Hip-Fire Crosshair Speed (when you shoot without scoping in).
Because 90% of close-range fights (using the M1887, MP40, or UMP) are done without aiming down sights (ADS), the General slider dictates your drag headshot success. If this is too low, your crosshair will magnetically lock onto the enemy’s chest, and no matter how hard you drag your thumb, it won’t reach the head.
B. Red Dot Sensitivity
This is highly misunderstood. Some guns (like the SCAR or M4A1) don’t have a physical scope attached when you pick them up. If you press the “Aim” button, it brings up a holographic red dot. This slider controls the speed of that specific aiming state.
If you are spraying an AR at mid-range and the bullets are flying over the enemy’s head, your Red Dot sensitivity is too high.
C. 2x and 4x Scope Sensitivity
When you attach a 2x or 4x scope (or use weapons that have them built-in, like the Woodpecker, SVD, or AUG), these sliders take over.
The Rule of Thumb: As magnification increases, sensitivity must decrease. A 4x scope zooms in significantly. If your 4x sensitivity is set to 100, the slightest touch of your thumb will send the crosshair flying into the sky. You need stability here to track enemies running horizontally across your screen.
D. Sniper Scope Sensitivity
This applies exclusively to the AWM, M82B, and Kar98k. Snipers in Free Fire are unique because they do not have auto-aim when scoped in. You must manually place the crosshair on the target. Therefore, this setting must be incredibly low to allow for micro-adjustments.
E. Free Look
This controls the “Eye” icon that allows you to look behind you while sprinting forward. It does not affect your shooting aim. Set it to whatever feels comfortable for situational awareness.
3. The Base Configurations by Device Tier (2026 Meta)
Do not just copy these blindly. Use them as your starting baseline. Go into the Training Grounds, apply the numbers for your specific device tier, and test them.
Tier 1: Low-End Devices (2GB – 4GB RAM)
Common Devices: Samsung Galaxy A/M series, Redmi 9/10, Realme C series.
These devices struggle with frame drops and have heavy, unresponsive screens. We must force the game to be as sensitive as possible so you don’t break your thumb trying to drag.
| Setting | Recommended Value | Reasoning |
|---|---|---|
| General | 100 | Mandatory. Do not lower it. You need maximum momentum. |
| Red Dot | 95 – 100 | To ensure mid-range AR drags don’t get stuck on the vest. |
| 2x Scope | 90 – 95 | Fast enough to track moving targets. |
| 4x Scope | 85 – 90 | Slightly lower to maintain long-range stability. |
| Sniper Scope | 50 – 60 | High enough to flick, low enough to aim manually. |
| Free Look | 50 | Standard visibility. |
Tier 2: Mid-Range Devices (6GB – 8GB RAM)
Common Devices: POCO X3/X4 Pro, Redmi Note 12 Pro, Realme Narzo, OnePlus Nord.
This is the sweet spot. The screens are usually 90Hz+ and have decent touch sampling. Setting everything to 100 here might cause your crosshair to jitter or shake during intense fights.
| Setting | Recommended Value |
|---|---|
| General | 92 – 98 |
| Red Dot | 88 – 92 |
| 2x Scope | 85 |
| 4x Scope | 75 – 80 |
| Sniper Scope | 40 – 45 |
| Free Look | 50 |
Tier 3: High-End Androids & iOS (iPhones, ROG, Black Shark)
Common Devices: iPhone 13/14/15 Pro Max, ASUS ROG Phone 8, Samsung Galaxy S24 Ultra.
These devices are incredibly slippery. The processors render frames instantly. If you use 100 General on an iPhone 15 Pro Max, you will physically not be able to control the camera. It will spin too fast.
| Setting | Recommended Value |
|---|---|
| General | 80 – 88 |
| Red Dot | 75 – 80 |
| 2x Scope | 70 – 75 |
| 4x Scope | 65 – 70 |
| Sniper Scope | 30 – 35 |
| Free Look | 50 |
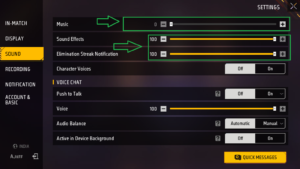
[📸 DEMO IMAGE: Screenshot of the Free Fire settings menu showing the Mid-Range 95 General configuration]Alt Text: Optimal Free Fire sensitivity settings in the game menu
4. The Secret World of DPI (Dots Per Inch)
If you have maxed out your General Sensitivity to 100 and your drag still feels heavy, you have entered the realm where in-game settings are no longer enough. You must modify your phone’s operating system. Welcome to DPI scaling.
DISCLAIMER: Changing your DPI alters your phone’s display resolution scaling. If you increase it too high, your phone may crash, bootloop, or require a factory reset. Do this entirely at your own risk. Do NOT exceed an increase of +150 from your default number. Cover Expert is not responsible for device damage.
What does DPI do in Free Fire?
In Android Developer Options, DPI is often listed as “Smallest Width” or “Minimum Width.” By increasing this number, you make the pixels on your screen “smaller.” Your phone thinks the screen is physically larger than it is.
Because the elements are smaller, your thumb travels a physically shorter distance on the glass to cover the same amount of digital space in the game. The result? Hyper-speed touch sensitivity. It feels like removing gravity from your crosshair.
How to safely change your DPI (Android Only)
- Go to your phone’s Settings.
- Scroll down to About Phone.
- Find the Build Number and tap it rapidly 7 times. This unlocks “Developer Mode.”
- Go back to Settings, find System, and open Developer Options.
- Scroll down until you find the “Drawing” section. Look for Smallest Width.
- CRITICAL STEP: Write down the default number! (It is usually 360, 392, or 411). You will need this to revert back to normal later.
- Change the number to increase your sensitivity.
Safe DPI Increments
- If Default is 360: Change it to 460 (Safe) or max 500 (Aggressive).
- If Default is 411: Change it to 511 (Safe) or max 580 (Aggressive).
Do NOT set it to numbers like 800 or 1000. Your icons will become invisible, your keyboard will shrink to the size of a peanut, and your phone might overheat and crash.
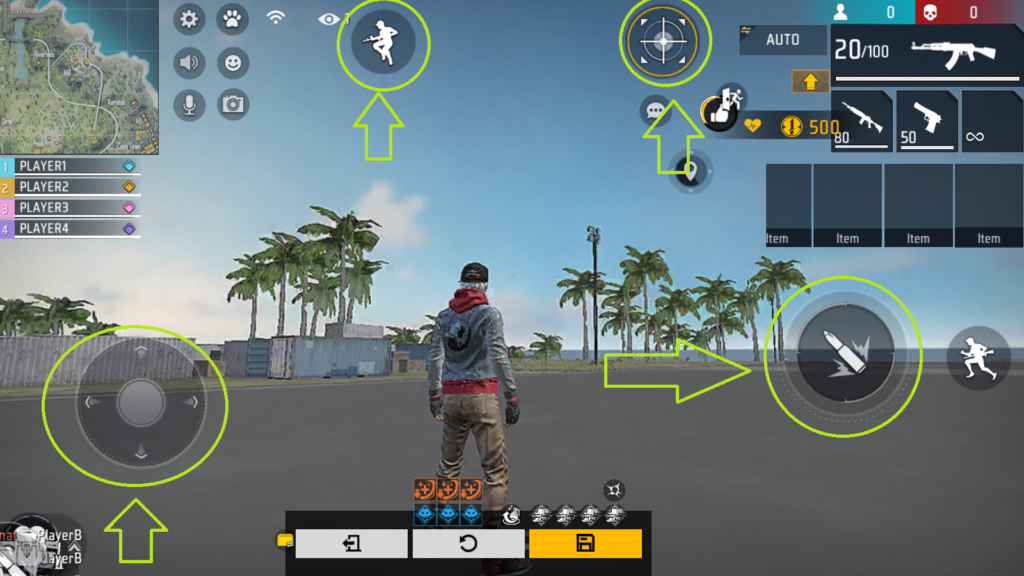
5. HUD Layout: The “Fire Button” Physics
Sensitivity is useless if your Custom HUD is fighting against you. The size and placement of your Right Fire Button directly impact your drag geometry.
The Position Rule (The Runway)
If you place your fire button too high up on the screen, you have no room to drag your thumb upwards before hitting the edge of your phone. You need a “Runway.”
The Fix: Move your Right Fire Button to the bottom 1/3rd of the screen. Keep it relatively close to the bottom edge (but not so low that your thumb misses it). This gives you a massive vertical runway to drag your thumb all the way up for those explosive shotgun flicks.
The Size Rule
Big buttons are easy to press, but bad for dragging. Small buttons are hard to press, but excellent for dragging. Why? Because a smaller button concentrates the touch point, making the drag vector more precise.
The Sweet Spot: Set your Right Fire Button size between 45% and 55%. Do not make it 100%. A 100% fire button is sluggish and causes the crosshair to stick to the chest heavily.

6. Physical Friction: The Real-World Obstacles
You can have the best settings in the world, but if your thumb gets stuck on the glass due to friction, the drag will stutter, and the bullet will miss.
The Enemy: Sweat and Oil
In the final zone (Zone 6), your heart rate spikes. Your hands sweat. A sweaty thumb dragging across a glass screen creates friction. It causes your drag to jump in micro-stutters. This ruins the smooth curve required for a headshot.
The Solutions
- Gaming Thumb Sleeves (Highly Recommended): These cost less than $5 (or ₹150) online. They are woven from silver or carbon fiber. They slip over your thumbs and completely eliminate friction. Your thumb will glide over the screen like ice, absorbing sweat. Every Grandmaster player uses these.
- The Baby Powder Trick (The F2P Option): If you don’t have sleeves, lightly dust your right thumb with baby powder or talcum powder. It instantly smooths the screen. Be very careful not to get powder inside your phone’s charging port or speakers.
- Screen Protectors: Matte (Anti-glare) screen protectors are significantly better for mobile gaming than glossy tempered glass. Matte protectors are inherently smoother and don’t grip the skin.
7. The Calibration Routine (5-Step Training Drill)
Do not take the settings from this guide and jump straight into a Ranked Battle Royale match. You will lose points. Your muscle memory is currently tuned to your old settings. You must recalibrate your brain.
Go to the Training Grounds (Combat Zone) and follow this 15-minute routine:
Step 1: The Static Test
Pick up a UMP. Stand 15 meters away from the stationary Adam dummy. Drag straight up. If the bullets fly over the head, decrease General by -2. If they hit the chest, increase General by +2. Keep adjusting until the spray locks onto the head consistently.
Step 2: The “J” Drag Test
Move to the moving dummy area. Wait for the dummy to run to the right. Execute the “Rotational Drag” (The J-Shape swipe: drag slightly down, then curve up-right). If your crosshair lags behind the dummy, your sensitivity is too low. If it shoots in front of the dummy, it’s too high.
Step 3: The Shotgun Flick
Pick up the M1887. Stand close to a moving target (3 meters). Practice the “White Aim” trick. Keep your crosshair white (not on the enemy) near their shoulder, then perform an explosive flick towards their head. This tests your maximum burst speed.
Step 4: The 360 Gloo Wall Test
Equip Gloo Walls in the training zone. Sprint, jump, crouch, and try to spin the camera 360 degrees while placing walls. If you cannot complete a full circle without lifting your thumb, your General sensitivity (or DPI) is too low.
Step 5: The Red Dot Spray
Pick up an SCAR or AK47. Equip a Level 3 Foregrip. Stand far back. Aim at a distant dummy (causing the Red Dot to appear). Spray 10 bullets while dragging up. If the recoil bloom is uncontrollable, lower your Red Dot sensitivity.
8. Diagnosing Common Mistakes (Q&A)
Even with perfect settings, things go wrong. Let’s diagnose your specific problem.
Problem: “When I use the MP40, the first bullet hits the head, but the rest go over his head into the sky.”
Diagnosis: You are dragging too violently for an SMG. Shotguns require explosive flicks. SMGs require a smooth, continuous, tracking drag. Slow down your thumb movement after the initial swipe.
Problem: “My AWM shots are missing moving targets.”
Diagnosis: Your Sniper Scope sensitivity is too high. Sniping in Free Fire isn’t hit-scan; there is slight bullet travel time. If your sensitivity is too high, you are over-flicking past the target. Drop it to 30 and practice “tracking” the enemy smoothly rather than flicking.
Problem: “I can headshot bots perfectly, but real players always kill me first.”
Diagnosis: Bots stand still or run in straight lines. Real players Zig-Zag and jump. You are likely using a “Straight Drag” against a moving target. You must learn the Rotational Drag (J-Drag) to curve your bullets into moving hitboxes.
Conclusion
Finding the perfect sensitivity in Free Fire is a journey, not a destination. As you get better at the game, your thumbs will naturally get faster, and you may find yourself lowering your sensitivity over time to gain more precision.
Remember, no setting will replace practice. The players who dominate the leaderboards are the ones who spend hours in the Training Grounds refining their drag timing, learning the recoil patterns of every gun, and mastering their Gloo Wall speed.
Apply these settings, buy some thumb sleeves, test the DPI limits of your phone safely, and stop blaming the game. The mechanics are in your hands now. Go get that Booyah.